Loading
ReefSense pH & Temperature Probe
Introduction
The ReefSense pH & Temperature Probe adds continuous, accurate pH monitoring to your ReefControl Pro/Lite. It’s a digital probe with a built-in temperature sensor, so it reports both your aquarium’s pH and its temperature to the ReefBeat App in real time – with 30-day logs and notifications – and it can use those readings to switch your equipment automatically.
Because it is digital, the probe does much of the work for you: it compensates its pH reading for temperature automatically, guides you through calibration step by step, stores its own calibration data, and keeps track of its own condition so the app can tell you when it is nearing the end of its life.
This manual assumes you already have a ReefControl Lite or Pro set up and running in the ReefBeat App. If you don’t, set up your ReefControl Pro/Lite first using its own manual, then come back here to add the pH & Temperature Probe.
Understanding pH in your reef aquarium
pH is a measure of how acidic or alkaline your aquarium water is. It matters in a reef tank because it affects coral calcification and overall biological stability, and it reflects the balance between carbon dioxide, bicarbonate and carbonate in the water.
Most reef aquariums sit around pH 7.8-8.4, and many reef-keepers aim for roughly 8.0-8.3. The exact number matters less than stability – a steady daily rhythm without large swings is the goal.
pH naturally rises and falls over the course of a day:
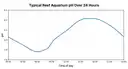
• pH is usually lowest early in the morning, just before or shortly after the lights come on: through the night, respiration adds CO₂ to the water, which lowers pH.
• As the lights come on, photosynthesis by algae and the corals’ zooxanthellae consumes CO₂, and pH rises through the day.
• In the late afternoon the curve often flattens into a plateau – the tank has reached its maximum daily photosynthesis for the current alkalinity, CO₂, gas exchange and lighting.
• After lights-out, photosynthesis stops, respiration takes over again, CO₂ builds up, and pH falls back overnight.
A daily swing of about 0.1-0.3 pH is completely normal in a thriving reef. Low pH is often caused by excess CO₂ in the room or the tank, while alkalinity acts as a buffer that slows pH changes – so pH is best read alongside your alkalinity, aeration, CO₂ and lighting, not on its own.

Practical note:
Don’t chase a single pH number. A stable daily rhythm, suitable alkalinity, good aeration and avoiding excessive indoor CO₂ matter more than forcing the reading to an exact value.
This is also why the probe is calibrated with pH 7 and pH 10 solutions: they bracket the normal reef range (around pH 8) far better than the pH 4 and pH 7 solutions used for freshwater.
What’s in the box
• ReefSense pH & Temperature Probe – R35821
• 2 calibration solution sachets (pH 7 and pH 10)
A probe holder and a calibration vial are not included. You’ll need a probe holder to position the probe in your aquarium or sump – the ReefSense single probe holder (R35837) or the ReefSense magnetic probe holder (R35826) – and a small clean container to hold the solution when you calibrate.
Installation and placement
Position the probe in the aquarium or sump where there is good, steady water flow, using a probe holder, with the glass membrane at the tip fully immersed at all times. Avoid spots with trapped air or heavy detritus. The ReefSense single probe holder (R35837) is an optional accessory for positioning the probe.
1. Remove the storage cap before use. The probe ships with a storage cap – held on by a compression fitting – that keeps the glass membrane wet and stops the storage solution leaking during transport and storage. Take it off before installing the probe. Keep the cap: you can refill it with storage solution to keep the tip wet if you ever take the probe out of service.
2. Fit the probe into your probe holder and position it in the water with good flow around the tip.
3. Connect the probe to the ReefSense port connector cable, making sure the securing nut is fully closed for a stable, waterproof connection.
4. Arrange the cable into a drip loop so water can’t run down it to the connector.
Note:
Never let the glass membrane dry out. If you remove the probe from the water for more than a short time, keep the tip in storage solution or aquarium water (see Maintenance). A dried-out membrane gives slow, unstable readings.
Adding the probe in the ReefBeat App
Add the probe to your ReefControl Pro/Lite in the app:
1. Open your ReefControl Pro/Lite in the ReefBeat App and choose Setup Probe, then select pH & Temperature.
2. The app shows the ID of the probe it has found so you can confirm you’re setting up the right one, then continue. (If the app doesn’t detect the probe, check the connection and try again.)
3. If a newer version of the probe’s firmware is available, the app updates it before continuing over Bluetooth – keep your phone within approximately 3 m (10′) of the probe and leave the app open during the update.
4. Give the probe a name, or keep the default.
5. Set the parameter ranges for pH (and for temperature), and choose whether to switch on the audible alarm for this probe.
6. Calibrate the probe now or later (see Calibration).
Note:
You can add more than one pH Probe to the same ReefControl Pro/Lite. If you do, connect and set them up one at a time. If several new probes are connected at once before setup, the controller picks one of them at random, and you’ll have to check serial numbers to tell which is which.
Parameter ranges (Desired / Acceptable / Danger). For each parameter you set two ranges that tell ReefControl Pro/Lite what “normal” looks like for your tank: a Desired range (green, your target) and an Acceptable range (orange, drifting away from the target). Anything outside the Acceptable range is automatically the Danger range (red) – you don’t set this yourself. Your readings show against these on the homepage and in the graphs, and you can choose, for each parameter, to be notified when a reading enters its Danger range. You can also switch on the audible alarm; it is then enabled whenever a reading is outside the Acceptable range, and a short press of the Manual Control button silences it.
Note:
Because pH naturally swings through the day (see Understanding pH), set your Acceptable range wide enough to allow the normal day/night rhythm, so you aren’t alerted by healthy fluctuations.
Calibration
A pH probe measures a tiny voltage on its glass membrane that is proportional to the pH of the water; calibration defines how the probe turns those millivolts into a pH value. The sensing element ages gradually with use, so its readings slowly drift – calibrating corrects for this and keeps your readings accurate. For a reef aquarium, recalibrate about once a month.
The probe is digital, so the ReefBeat App guides you through the whole process and the probe calibrates itself and stores its own calibration data, reporting back as each point succeeds. With good care a ReefSense pH Probe lasts up to about 12 months of continuous use; it monitors its own condition and the app lets you know as it nears the end of its life.
What you need
The pH 7 and pH 10 calibration sachets supplied with the probe, a small clean container to hold each solution, and some RO water for rinsing. Always use fresh solution and don’t reuse solution the probe has already been in – contaminated solution gives a false calibration.
Calibration points
For a reef (marine) aquarium, with a pH around 8, calibrate at pH 7 and pH 10 – the two solutions supplied – and both points are needed for a correct calibration. (On a freshwater aquarium you’d calibrate at pH 4 and pH 7 instead. Red Sea doesn’t supply a pH 4 solution, but pH 4 calibration solutions are widely available – just choose the matching solution from the list in the app.) In the app, solutions are grouped into Low, Mid and High ranges – for a reef tank you’ll use the Mid (pH 7) and High (pH 10) solutions.
The calibration process
The ReefBeat App guides you through each step:
1. When prompted, clean the probe, rinse it with RO water and dry it – this stops residue from contaminating the solution. Dry only the outside of the probe; do not wipe the glass membrane, as this can damage it and make readings unstable.
2. Place the probe in the first solution and gently wiggle it to release any air bubbles trapped against the glass membrane, then select the exact solution you’re using from the list.
3. When you start the calibration, the probe stabilises for about three minutes and records the point automatically. (If you prefer, let it sit a few extra minutes for analytical-grade accuracy that reef monitoring doesn’t normally need.)
4. The app shows the measured pH of the solution so you can confirm it looks right. If a reading falls outside the expected range for that solution, the app tells you so you can rinse and try again.
5. Rinse and dry the probe, then repeat for the second solution.
The first calibration
Your probe is calibrated at the factory, but after time in its storage solution between manufacture and installation it should be recalibrated before you rely on it. Install it, let it run for a few hours to settle, then calibrate.
Calibration solutions and temperature
pH calibration solutions are precise buffers whose own pH changes slightly with temperature, so each has a nominal pH quoted at a reference temperature – Red Sea’s are pH 7.00 and pH 10.00 at 25 °C. The ReefSense pH Probe has these relationships built in: using its internal temperature sensor it knows the true pH of the solution at its current temperature and calibrates to that automatically – something a typical hobby pH meter can’t do.
One result is worth knowing in advance: at the end of calibration the app shows the solution’s actual pH at its current temperature, which may differ slightly from the nominal value on the sachet. This is correct. The difference is tiny for pH 7 but more noticeable for pH 10 – for example, a pH 10.00 (at 25 °C) solution that is actually at about 20 °C reads about 10.06, its true value at that temperature.
Actual pH of the calibration solutions at different temperatures:
Calibration temperature (°C)
pH 4.00 @25C
pH 7.00 @25C
pH 10.00 @25C
20
4.00
7.02
10.06
21
4.00
7.01
10.05
22
4.00
7.01
10.04
23
4.00
7.01
10.02
24
4.00
7.00
10.01
25
4.00
7.00
10.00
26
4.00
7.00
9.99
27
4.00
6.99
9.98
28
4.01
6.99
9.98
29
4.01
6.99
9.97
30
4.01
6.99
9.96
Calibrating at a sink (remote mode)
You can also calibrate the probe away from the controller, over Bluetooth, which is often more comfortable than working down beside the sump – see Remote mode for how to set this up.
Temperature
The probe also reports your water temperature, with its own ranges, log and control options, and it uses that temperature internally to compensate the pH reading. Because of this, the app offers a Temperature Calibration option rather than a simple offset: changing it also changes the pH value, so only adjust it with a high-precision laboratory temperature reference – otherwise leave it at the factory calibration.
Remote mode
You can use the pH Probe away from the controller, over Bluetooth – handy for taking a reading or calibrating at a sink rather than working down beside the sump. In remote mode the probe can be used for manual readings and for calibration.
1. Turn on remote use for the probe in the ReefBeat App.
2. Disconnect the probe from the ReefSense port connector.
3. Power the probe with the ReefSense USB-C connector (sold separately), plugged into any USB-C source.
4. In the app, tap Connect to start the Bluetooth (BLE) connection between the app and the probe.
When you’ve finished, you can tap Disconnect in the app, or simply remove power from the probe – once the probe is unpowered it disconnects automatically. Keep the glass membrane in water throughout. After returning the probe to the aquarium, wait about 30 seconds before cancelling remote mode in the app, to keep stray readings out of your logs.
Firmware updates
From time to time the ReefBeat App will let you know that a firmware update is available for your pH Probe. Keeping the firmware up to date ensures it stays compatible with the app. Firmware updates are performed via Bluetooth; the probe must be connected to your ReefControl Pro/Lite and not in Remote mode (ensure Bluetooth is enabled in your phone’s settings). When you run an update, keep your phone within approximately 3 m (10′) of the probe and leave the app open during the update.
Using the pH reading to control equipment
Your pH reading can switch equipment on and off automatically – for example, controlling the CO₂ solenoid on a calcium reactor so it eases off if pH drops too low, or triggering other pH-linked equipment. The pH Probe can control a 12 VDC port on the controller, or – if you have a ReefControl Power – any of its AC sockets.
Set the relevant port or socket to be controlled by the pH Probe, choose the value at which it switches, and set a fallback state in case the probe is ever disconnected. (See your ReefControl Pro/Lite manual for how to assign a port or socket.)
Note:
Because pH drifts up and down each day, set a sensible margin around the switching point so equipment doesn’t toggle on and off repeatedly.
Maintenance
The pH & Temperature Probe needs a little routine care to stay accurate, and its glass membrane is delicate, so handle it gently.
Keep the membrane hydrated. Never let the glass membrane dry out. If the probe is out of the water for more than a short time, keep the tip in storage solution or aquarium water. A dried-out membrane reads slowly and unstably.
Cleaning the probe
Keep the glass membrane clean so your readings stay accurate – but treat it gently. Never wipe, rub or touch the glass bulb at the tip: rubbing scratches the surface and builds up a static charge, both of which make readings slow and unstable. Clean by rinsing and soaking only.
Routine cleaning. Rinse the probe under RO water to remove salt and loose film. Do this each time you calibrate (about monthly), and whenever readings begin to look sluggish or drift.
Removing stubborn fouling. If organic film or mineral deposits have built up, clean in two stages, rinsing well with RO water between and after each stage:
1. Remove organics first with a diluted, plain (unscented) household bleach solution – 1 part bleach to 10 parts RO water. Soak the tip for 2-5 minutes, then rinse thoroughly with RO water.
2. Then remove mineral deposits with Red Sea’s probe cleaning solution (R35855), a weak acid, diluted 1:10 with RO water. Soak for 2-5 minutes, then rinse thoroughly with RO water.
WARNING:
Never allow bleach and the acid cleaning solution to mix – combining them releases toxic chlorine gas. Rinse the probe thoroughly with RO water between the two stages, never soak it in both at once, and handle household bleach with care.
Rehydrate and recalibrate. After cleaning, rehydrate the membrane for at least 30 minutes – in KCl probe storage solution if you have it, or in freshly mixed seawater if not – then recalibrate before relying on the readings.
You can do cleaning and calibration comfortably at a sink in remote mode (see Remote mode).
Tip:
Before taking the probe out of the water – for cleaning, for example – turn on Disable Probe in its settings so out-of-water readings aren’t recorded. Remember that a port or socket controlled by the probe switches to its fallback state while the probe is disabled.
It’s a wear part. The sensing element has a limited service life (up to about 12 months of continuous use). The probe tracks its own health and the app warns you as it ages, so you can replace it before readings become unreliable.
Troubleshooting
Press here for the Troubleshooting guide for the full ReefControl Family
Warranty
Note:
The ReefSense pH Probe contains a sensing element that wears with use and has a limited service life, so it carries a 6-month warranty (rather than the standard 24 months that applies to most ReefControl and ReefSense items).