Loading
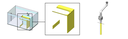
Check out your options for installing a ReefMat in Red Sea’s sumps
Installation guide
Helpful videos
REEFER G2/G2+
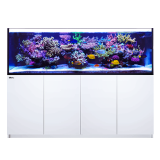
REEFER
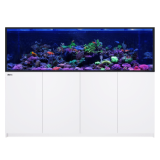
REEFER-S
Peninsula
MAX-S
Good news, REEFER G2/G2+ systems are ReefMat ready!
no modifications are required.

Not sure which model version you own? The serial number indicates the version.
Check it here

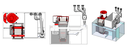
REEFER 170
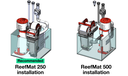
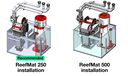
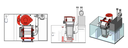
ReefMat 250 installation
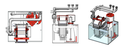
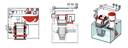
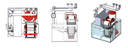
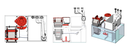
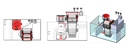
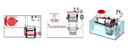
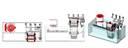
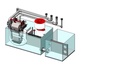
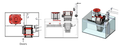
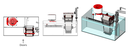
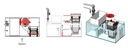
Installing both a ReefMat 250 and a skimmer (RSK-300) in the Reefer 170 requires modification of the sump and removal of the ATO reservoir.
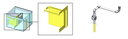
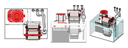
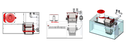
Remove the sump components (shown below in yellow) by cutting the silicone that holds the plastic/glass parts in place.
The valved downpipe will need to be shortened to attach the inlet hose of the ReefMat.
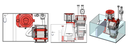
Equipment layout

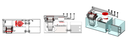
Required modification

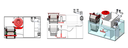
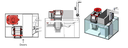
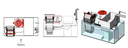
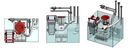
ReefMat 500 installation
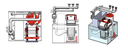
Installing both a ReefMat 500 and a skimmer (RSK-300) in the Reefer 170 requires modification of the sump and removal of the ATO reservoir.
Remove the sump components (shown below in yellow) by cutting the silicone that holds the plastic/glass parts in place.
The valved downpipe will need to be shortened to attach the inlet hose of the ReefMat.
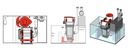
Equipment layout
Required modification


REEFER XL 200
ReefMat 250 installation
Installing both a ReefMat 250 and a skimmer (RSK-300) in the Reefer 200 requires modification of the sump and removal of the ATO reservoir.
Remove the sump components (shown below in yellow) by cutting the silicone that holds the plastic/glass parts in place.
The valved downpipe will need to be shortened to attach the inlet hose of the ReefMat.
Equipment layout

Required modification

ReefMat 500 installation
Installing both a ReefMat 500 and a skimmer (RSK-300) in the Reefer 200 requires modification of the sump and removal of the ATO reservoir.
Remove the sump components (shown below in yellow) by cutting the silicone that holds the plastic/glass parts in place.
The valved downpipe will need to be shortened to attach the inlet hose of the ReefMat.
Equipment layout
Required modification

REEFER XL 250v3
(serial numbers 18000 up to xxxxx)
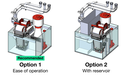
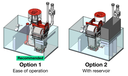
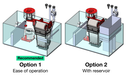
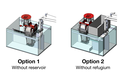
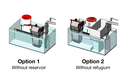
ReefMat 250 installation (recommended)
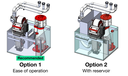
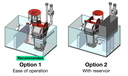
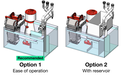
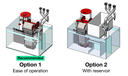
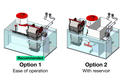
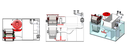
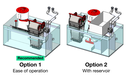
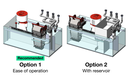
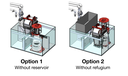
Option 1 – Ease of operation
This installation option gives optimal access to the skimmer (RSK-300) and the ReefMat 250 media basket.
This requires modification of the sump and removal of the ATO reservoir.
Remove the sump components (shown below in yellow) by cutting the silicone that holds the plastic/glass parts in place.
The valved downpipe will need to be shortened to attach the inlet hose of the ReefMat
Equipment layout
Required modification
Option 2 – with reservoir
This installation option allows the sump and reservoir to be used without any modification, however, the skimmer (RSK-300) will be difficult to maintain, no easy access to the media basket and there will be no room for any other equipment or a refugium.
Both the valved downpipe and overflow pipe will need to be shortened to bypass an unused dry area of the sump.
Equipment layout

Required modification

ReefMat 500 installation
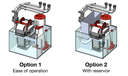
Option 1 – Ease of operation
This installation option gives optimal access to the skimmer (RSK-300) and the ReefMat 500 media basket.
This requires modification of the sump and removal of the ATO reservoir.
Remove the sump components (shown below in yellow) by cutting the silicone that holds the plastic/glass parts in place.
The valved downpipe will need to be shortened to attach the inlet hose of the ReefMat.
Equipment layout
Required modification
Option 2 – with reservoir
This installation option allows the sump and reservoir to be used without any modification, however, the skimmer (RSK-300) will be difficult to maintain, the ReefMat 500 media basket will only be accessible through the filter chamber, and there will be no room for any other equipment or a refugium.
Both the valved downpipe and overflow pipe will need to be shortened to bypass an unused dry area of the sump.
Equipment layout
Required modification
REEFER XL 300
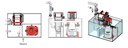
Option 1 – Ease of operation
This installation option gives optimal access to the ReefMat 500 media basket and Skimmer (RSK-300) as well as leaving room for additional equipment or a refugium.
This option requires modification of the sump and removal of the ATO reservoir.
Remove the sump components (shown below in yellow) by cutting the silicone that holds the plastic/glass parts in place.
The valved downpipe will need to be shortened to attach the inlet hose of the ReefMat.
Equipment layout
Required modification
Option 2 – with reservoir
This installation option allows the sump and reservoir to be used without any modification, however, the skimmer (RSK-300) will be difficult to maintain, the media basket will only be accessible through the filter chamber, and there will be no room for any other equipment.
Both the valved downpipe and overflow pipe will need to be shortened to bypass an unused dry area of the sump.
Equipment layout
Required modification


REEFER 350
(serial numbers up to 17999)
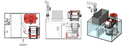
Option 1 – Ease of operation
This option allows maximum utilization of the sump and optimal access for maintenance of the ReefMat 500 together with an RSK-600 skimmer, and leaves room for additional equipment.
This option requires modification of the sump and removal of the ATO reservoir.
Remove the sump components (shown below in yellow) by cutting the silicone that holds the plastic/glass parts in place.
The valved downpipe will need to be shortened to attach the inlet hose of the ReefMat.
Equipment layout
Required modification

Option 2 – with reservoir
This option allows installation of the ReefMat 500 together with the RSK-300 skimmer without any modification to the sump or reservoir.
This option, however, does not leave space for additional equipment, and access for operation of the skimmer will be limited.
The valved downpipe will need to be shortened to bypass an unused dry area of the sump, and the overflow pipe will need to be rotated 180 degrees.
Equipment layout
Required modification

REEFER 350v3
(serial numbers 18000 up to xxxxx)
Option 1 – Ease of operation
This option allows maximum utilization of the sump, and optimal access for maintenance of the ReefMat 500 together with an RSK-300 skimmer, and leaves room for additional equipment or a refugium.
This option requires modification of the sump and removal of the ATO reservoir.
Remove the sump components (shown below in yellow) by cutting the silicone that holds the plastic/glass parts in place.
The valved downpipe will need to be shortened to attach the inlet hose of the ReefMat.
Equipment layout
Required modification
Option 2 – with reservoir
This option allows installation of the ReefMat 500 together with an RSK-300 skimmer without any modification to the sump or reservoir.
This option, however, does not leave space for a refugium or other equipment.
Both the valved downpipe and overflow pipe will need to be shortened to bypass an unused dry area of the sump.
Equipment layout
Required modification


REEFER XL 425
(serial numbers up to 17999)
Option 1 – Ease of operation
This option allows maximum utilization of the sump, and optimal access for maintenance of the ReefMat 500 together with an RSK-600 skimmer, and leaves room for additional equipment.
This option requires modification of the sump and removal of the ATO reservoir.
Remove the sump components (shown below in yellow) by cutting the silicone that holds the plastic/glass parts in place.
The valved downpipe will need to be shortened to attach the inlet hose of the ReefMat.
Equipment layout
Required modification

Option 2 – with reservoir
This option allows installation of the ReefMat 500 together with the RSK-600 skimmer without any modification to the sump or reservoir.
This option, however, does not leave space for additional equipment, and access for operation of the skimmer will be limited.
The valved downpipe will need to be shortened to bypass an unused dry area of the sump, and the overflow pipe will need to be rotated 180 degrees.
Equipment layout
Required modification

REEFER XL 425v3
(serial numbers 18000 up to xxxxx)
Option 1 – Ease of operation
This option allows maximum utilization of the sump, optimal access for maintenance of the ReefMat 500 together with an RSK-600 skimmer, and leaves room for additional equipment or a refugium ( Note: the ReefMat 1200 will also fit but is not recommended).
This option requires modification of the sump and removal of the ATO reservoir.
Remove the sump components (shown below in yellow) by cutting the silicone that holds the plastic/glass parts in place.
The valved downpipe will need to be shortened to attach the inlet hose of the ReefMat.
Equipment layout
Required modification
Option 2 – with reservoir
This option allows installation of the ReefMat 500 together with an RSK-600 skimmer, without any modification to the sump or reservoir.
This option, however, does not leave space for a refugium or other equipment.
Both the valved downpipe and overflow pipe will need to be shortened to bypass an unused dry area of the sump.
Equipment layout
Required modification


REEFER 450
Option 1 – Ease of operation
This option allows maximum utilization of the sump, optimal access for maintenance of the ReefMat 500 together with an RSK-600 skimmer, and leaves room for additional equipment (Note: the ReefMat 1200 will also fit but is not recommended).
This option requires modification of the sump and removal of the ATO reservoir.
Remove the sump components (shown below in yellow) by cutting the silicone that holds the plastic/glass parts in place.
The valved downpipe will need to be shortened to attach the inlet hose of the ReefMat.
Equipment layout

Required modification

Option 2 – with reservoir
This option allows installation of the ReefMat 500 together with the RSK-600 skimmer without any modification to the sump or reservoir (Note: the ReefMat 1200 will also fit but is not recommended).
This option, however, does not maximize the use of the available space in the sump.
The valved downpipe will need to be shortened to bypass an unused dry area of the sump, and the overflow pipe will need to be rotated 180 degrees.
Equipment layout
Required modification

REEFER XL 525
(serial numbers up to 17999)
Option 1 – Ease of operation
This option allows maximum utilization of the sump, optimal access for maintenance of the ReefMat 1200 together with an RSK-600 skimmer, and leaves room for additional equipment.
This option requires modification of the sump and removal of the ATO reservoir.
Remove the sump components (shown below in yellow) by cutting the silicone that holds the plastic/glass parts in place.
The valved downpipe will need to be shortened to attach the inlet hose of the ReefMat.
Equipment layout
Required modification
Option 2 – with reservoir
This option allows installation of the ReefMat 1200 together with the RSK-600 skimmer without any modification to the sump or reservoir (The ReefMat 500 is also suitably rated for this system and will provide more room in the sump).
This option, however, does not maximize the use of the available space in the sump.
The valved downpipe will need to be shortened to bypass an unused dry area of the sump, and the overflow pipe will need to be rotated 180 degrees.
Equipment layout
Required modification
REEFER XL 525v3
(serial numbers 18000 up to xxxxx)
Option 1 – Ease of operation
This option allows maximum utilization of the sump, gives optimal access for maintenance of the ReefMat 1200 together with an RSK-600 skimmer, and leaves room for additional equipment or a refugium.
This option requires modification of the sump and removal of the ATO reservoir.
Remove the sump components (shown below in yellow) by cutting the silicone that holds the plastic/glass parts in place.
The valved downpipe will need to be shortened to attach the inlet hose of the ReefMat.
Equipment layout
Required modification
Option 2 – with reservoir
This option allows installation of the ReefMat 1200 together with an RSK-600 skimmer without any modification to the sump or reservoir (The ReefMat 500 is also suitably rated for this system and will provide more room in the sump).
This option, however, does not leave space for a refugium or other equipment.
Both the valved downpipe, and overflow pipe will need to be shortened to bypass an unused dry area of the sump.
Equipment layout
Required modification


REEFER XXL 625
Option 1 – Ease of operation
This option allows maximum utilization of the sump, gives optimal access for maintenance of the ReefMat 1200 together with an RSK-900 skimmer, and leaves room for additional equipment or a refugium.
This option requires modification of the sump and removal of the ATO reservoir.
Remove the sump components (shown below in yellow) by cutting the silicone that holds the plastic/glass parts in place.
The valved downpipe will need to be shortened to attach the inlet hose of the ReefMat.
Equipment layout
Required modification

Option 2 – with reservoir
This option allows installation of the ReefMat 1200 together with an RSK-900 skimmer without any modification to the sump or reservoir.
This option, however, does not leave space for a refugium or other equipment.
Both the valved downpipe and overflow pipe will need to be shortened to bypass an unused dry area of the sump.
Equipment layout
Required modification

REEFER XXL 750
Option 1 – Ease of operation
This option allows maximum utilization of the sump, gives optimal access for maintenance of the ReefMat 1200 together with an RSK-900 skimmer, and leaves room for additional equipment or a refugium.
This option requires modification of the sump and removal of the ATO reservoir.
Remove the sump components (shown below in yellow) by cutting the silicone that holds the plastic/glass parts in place.
The valved downpipe will need to be shortened to attach the inlet hose of the ReefMat.
Equipment layout
Required modification
Option 2 – with reservoir
This option allows installation of the ReefMat 1200 together with an RSK-900 skimmer without any modification to the sump or reservoir.
This option, however, does not leave much space for a refugium or other equipment.
Both the valved downpipe and overflow pipe will need to be shortened to bypass an unused dry area of the sump.
Equipment layout
Required modification

REEFER 3XL 900

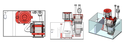
This installation allows maximum utilization of the sump, optimal access for maintenance of the ReefMat 1200 together with an RSK-900 skimmer, and leaves room for additional equipment or a refugium in the main sump.
This option requires modification of the Sump.
Remove the sump components (shown below in yellow) by cutting the silicone that holds the plastic/glass parts in place.
The valved extension downpipe will need to be shortened (and reduced to 32mm with the parts provided) to attach the inlet hose of the ReefMat.
Equipment layout

Required modification

REEFER S-850
This installation allows maximum utilization of the sump, optimal access for maintenance of the ReefMat 1200 together with an RSK-900 skimmer, and leaves room for additional equipment or a refugium in the main sump.
This option requires modification of the Sump.
Remove the sump components (shown below in yellow) by cutting the silicone that holds the plastic/glass parts in place.
The valved extension downpipe will need to be shortened (and reduced to 32mm with the parts provided) to attach the inlet hose of the ReefMat.
Equipment layout
Required modification

REEFER S-1000

This installation allows maximum utilization of the sump, optimal access for maintenance of the ReefMat 1200 together with an RSK-900 skimmer, and leaves room for additional equipment or a refugium in the main sump.
This option requires modification of the Sump.
Remove the sump components (shown below in yellow) by cutting the silicone that holds the plastic/glass parts in place.
The valved extension downpipe will need to be shortened (and reduced to 32mm with the parts provided) to attach the inlet hose of the ReefMat.
Equipment layout

Required modification


REEFER Peninsula 500 – doors on the right
Option 1: ReefMat & Refugium (without reservoir)
This option allows maximum utilization of the sump, gives optimal access for maintenance of the ReefMat 1200 together with an RSK-600 skimmer, and leaves room for additional equipment or a refugium (The ReefMat 500 is also suitably rated for this system and will provide more room in the sump).
This option requires modification of the sump and removal of the ATO reservoir.
Remove the sump components (shown below in yellow) by cutting the silicone that holds the plastic/glass parts in place.
The valved downpipe will need to be shortened to attach the inlet hose of the ReefMat.
Equipment layout
Required modification

Option 2: ReefMat & Reservoir (without Refugium)
This option allows installation of the ReefMat 500 together with an RSK-600 skimmer without any modification to the sump or reservoir.
This option, however, does not leave space for a refugium or other equipment.
Both the valved downpipe and overflow pipe will need to be shortened to bypass an unused dry area of the sump.
Equipment layout
Required modification

REEFER Peninsula 500 – doors on the left
Option 1: ReefMat & Refugium (without reservoir)
This option allows maximum utilization of the sump, gives optimal access for maintenance of the ReefMat 500 (freestanding leg installation) together with an RSK-600 skimmer, and leaves room for additional equipment or a refugium.
This option requires modification of the sump and removal of the ATO reservoir.
Remove the sump components (shown below in yellow) by cutting the silicone that holds the plastic/glass parts in place.
The valved downpipe will need to be shortened to attach the inlet hose of the ReefMat.
Equipment layout
Required modification

Option 2: ReefMat & Reservoir (without Refugium)
This option allows installation of the ReefMat 500 together with an RSK-600 skimmer without any modification to the sump or reservoir.
This option, however, does not leave space for a refugium or other equipment.
Both the valved downpipe and overflow pipe will need to be shortened to bypass an unused dry area of the sump.
Equipment layout
Required modification

REEFER Peninsula 650 – doors on the right
Option 1: ReefMat & Refugium (without reservoir)
This option allows maximum utilization of the sump, gives optimal access for maintenance of the ReefMat 1200 together with an RSK-900 skimmer, and leaves room for additional equipment or a refugium.
This option requires modification of the sump and removal of the ATO reservoir.
Remove the sump components (shown below in yellow) by cutting the silicone that holds the plastic/glass parts in place.
The valved downpipe will need to be shortened to attach the inlet hose of the ReefMat.
Equipment layout
Required modification

Option 2: ReefMat & Reservoir (without Refugium)
This option allows installation of the ReefMat 1200 together with an RSK-900 skimmer without any modification to the sump or reservoir.
This option, however, does not leave much space for a refugium or other equipment.
Both the valved downpipe and overflow pipe will need to be shortened to bypass an unused dry area of the sump.
Equipment layout
Required modification


REEFER Peninsula 650 – doors on the left

This option allows installation of the ReefMat 1200 together with an RSK-900 skimmer without any modification to the sump or reservoir.
This option, however, does not leave much space for a refugium or other equipment.
Both the valved downpipe and overflow pipe will need to be shortened to bypass an unused dry area of the sump.
Equipment layout
Required modification

MAX-S 500

The ReefMat 500 should be installed in the left chamber of the sump without the media basket.
Both the valved downpipe and overflow pipe will need to be shortened to bypass an unused dry area of the sump.
Equipment layout
Required modification

MAX-S 650

The ReefMat 1200 should be installed in the middle chamber of the sump without the media basket.
Both the valved downpipe and overflow pipe will need to be shortened to bypass an unused dry area of the sump.
Equipment layout
Required modification

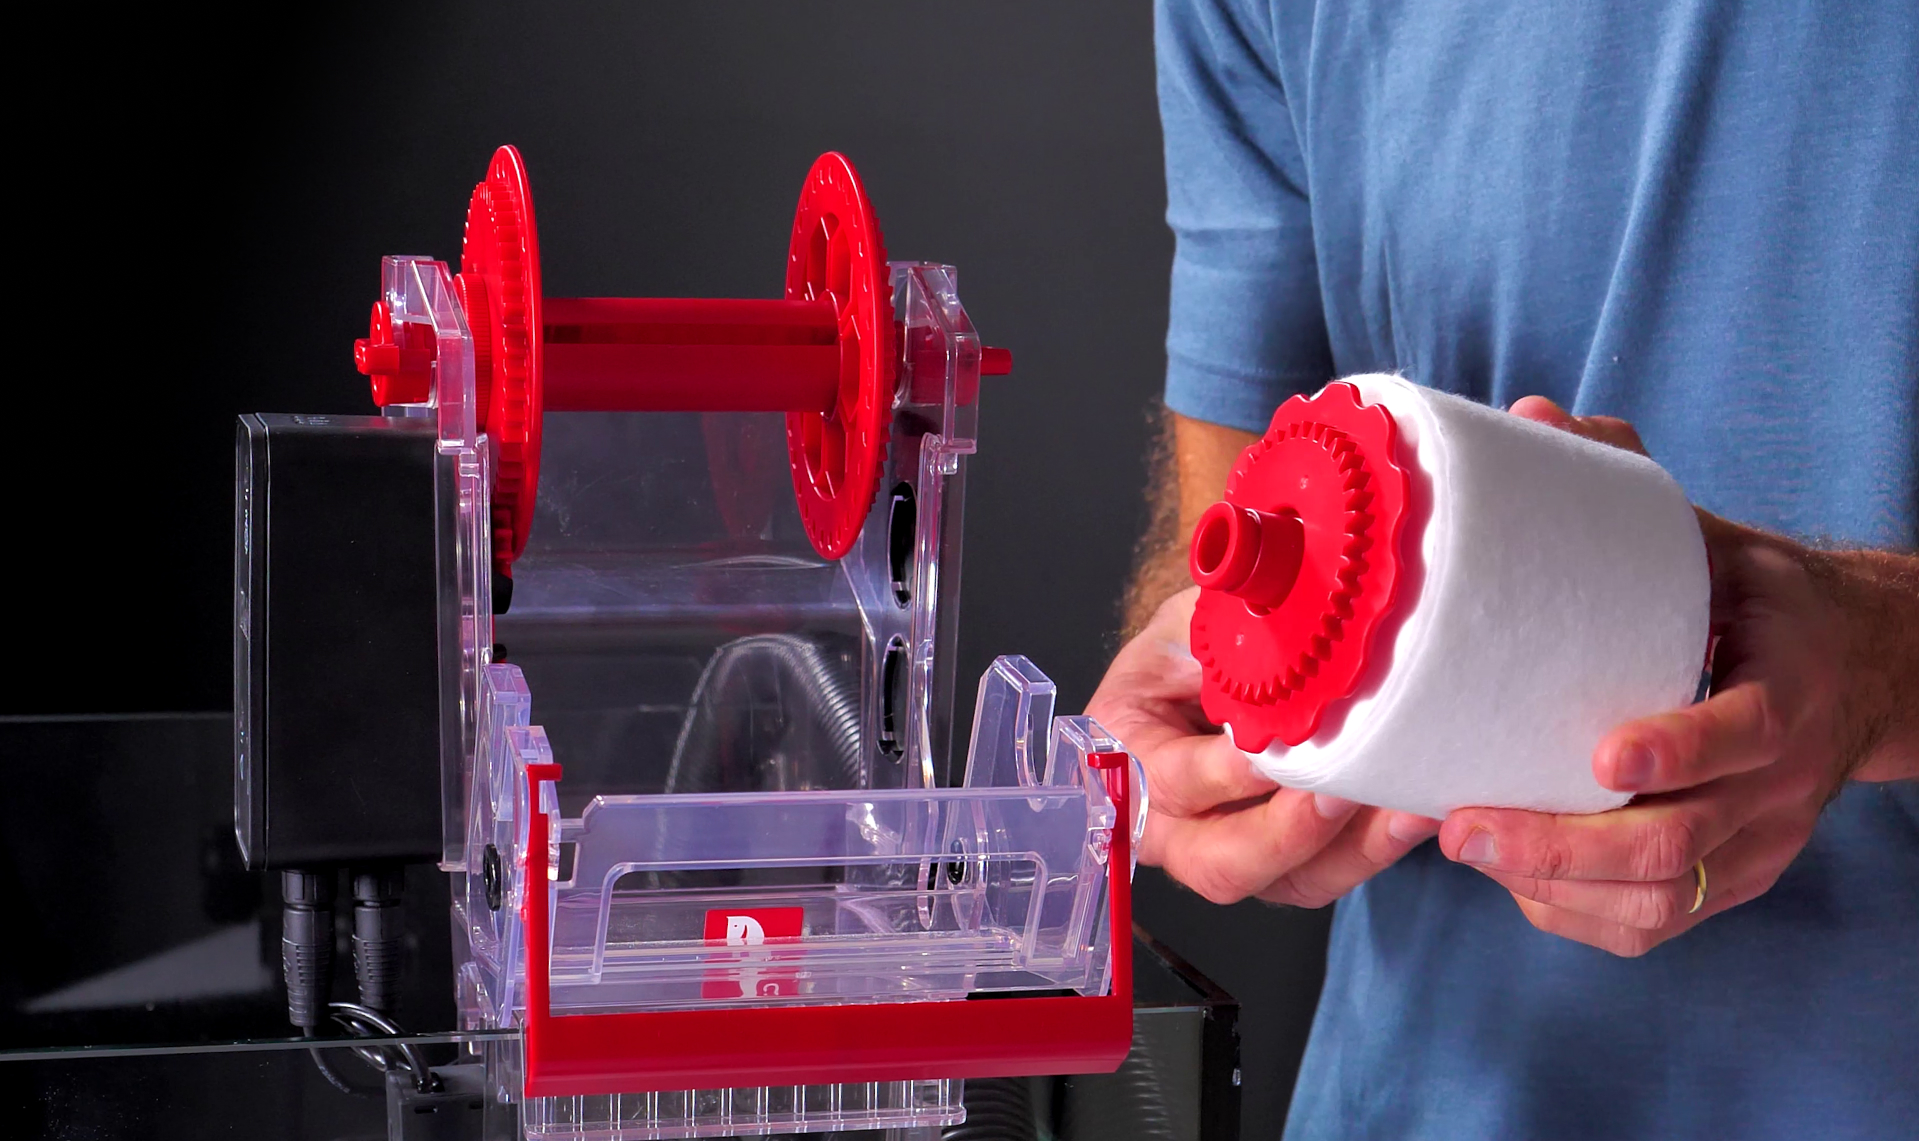
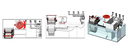
How to set up the ReefMat 250
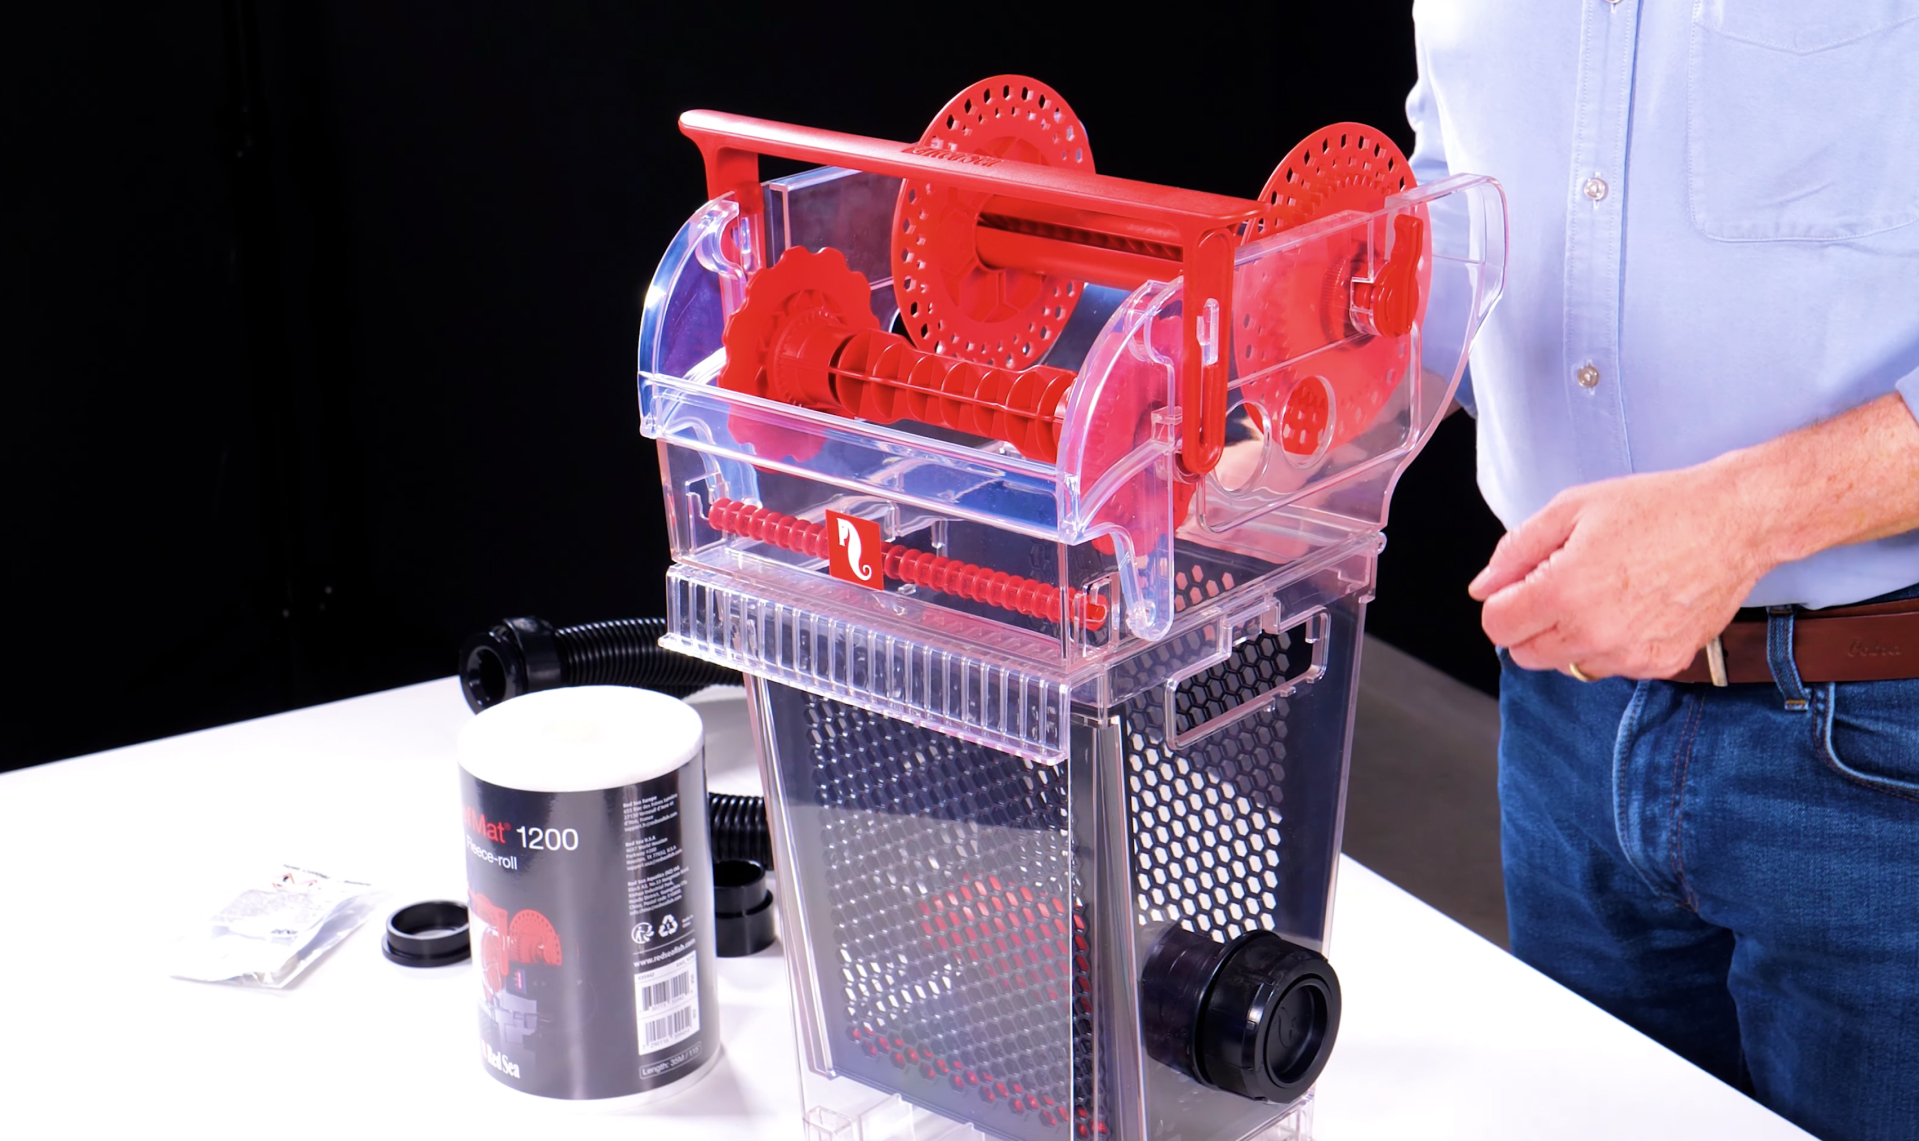
How to set up the ReefMat 500/1200
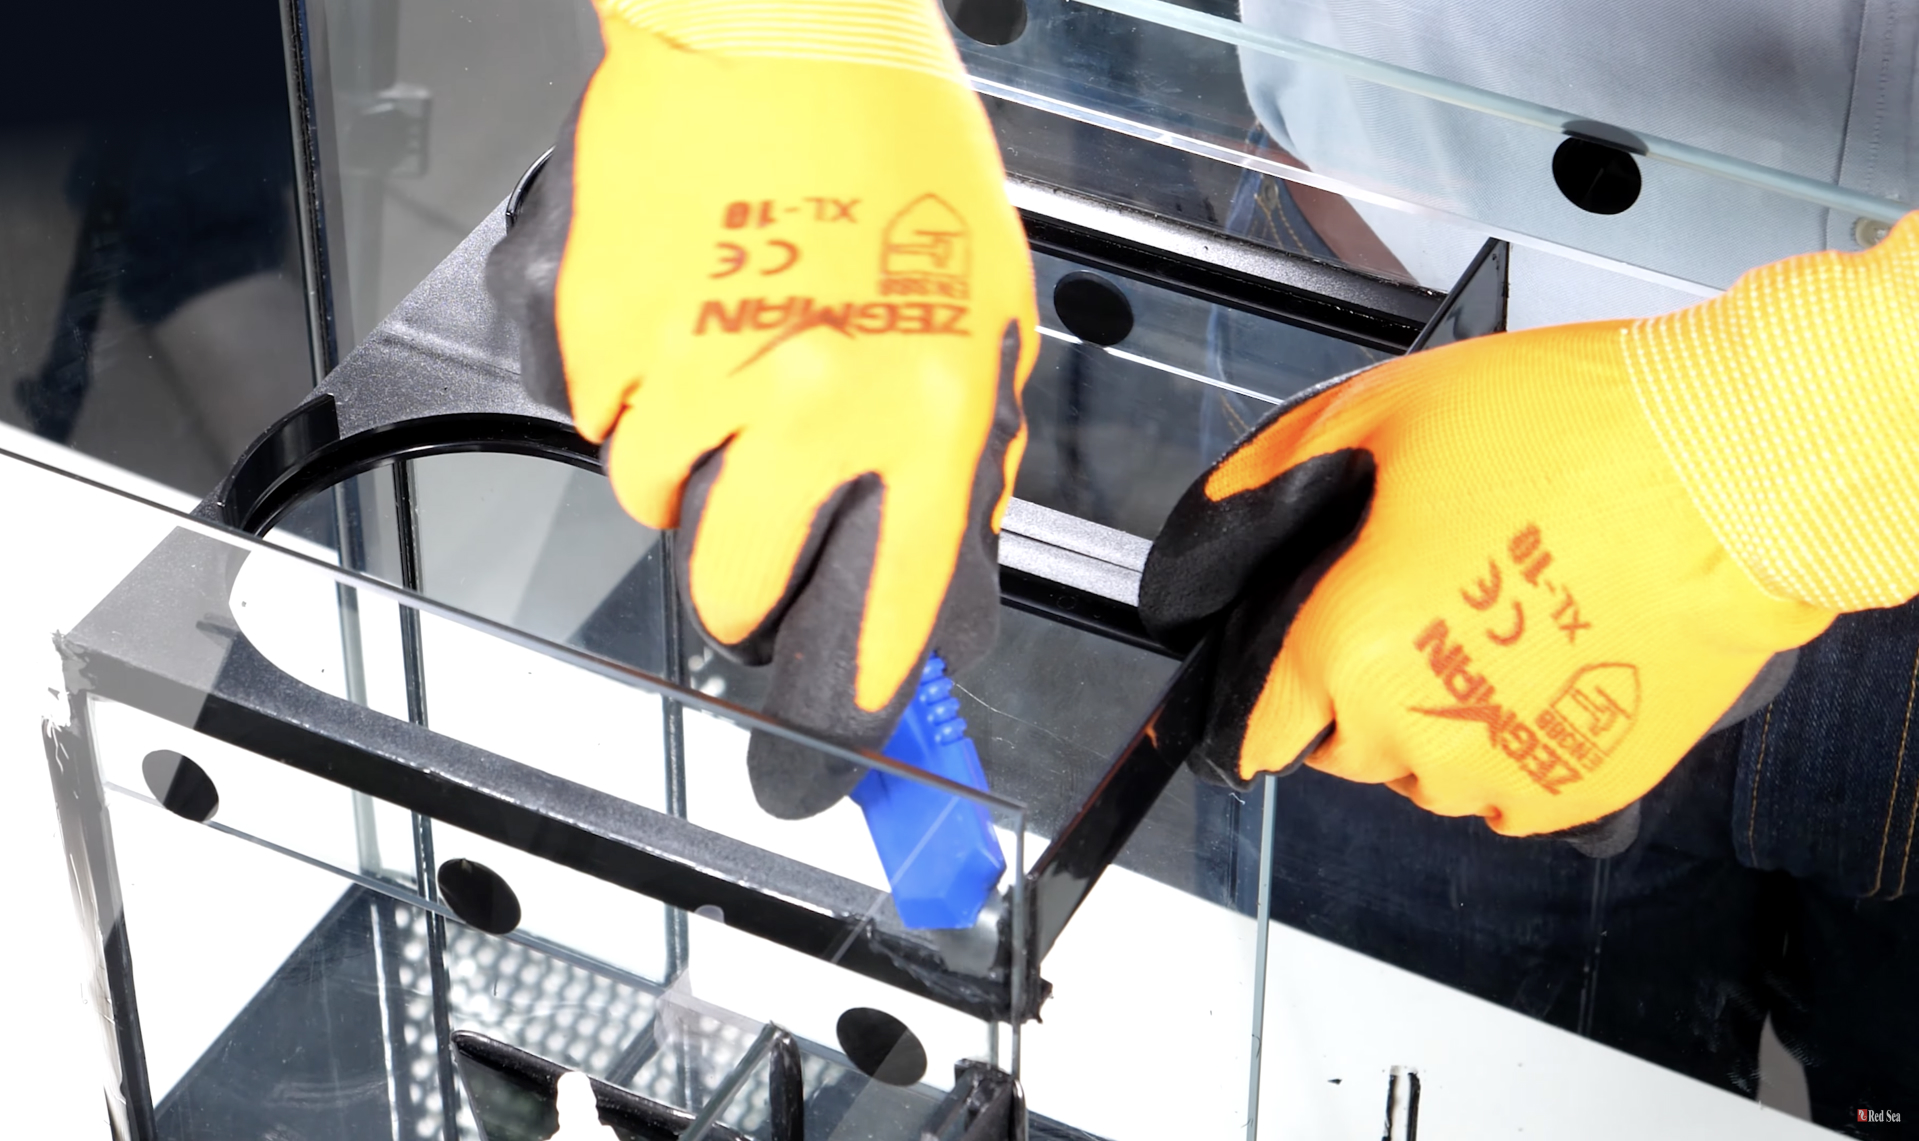
How to modify your REEFER sump
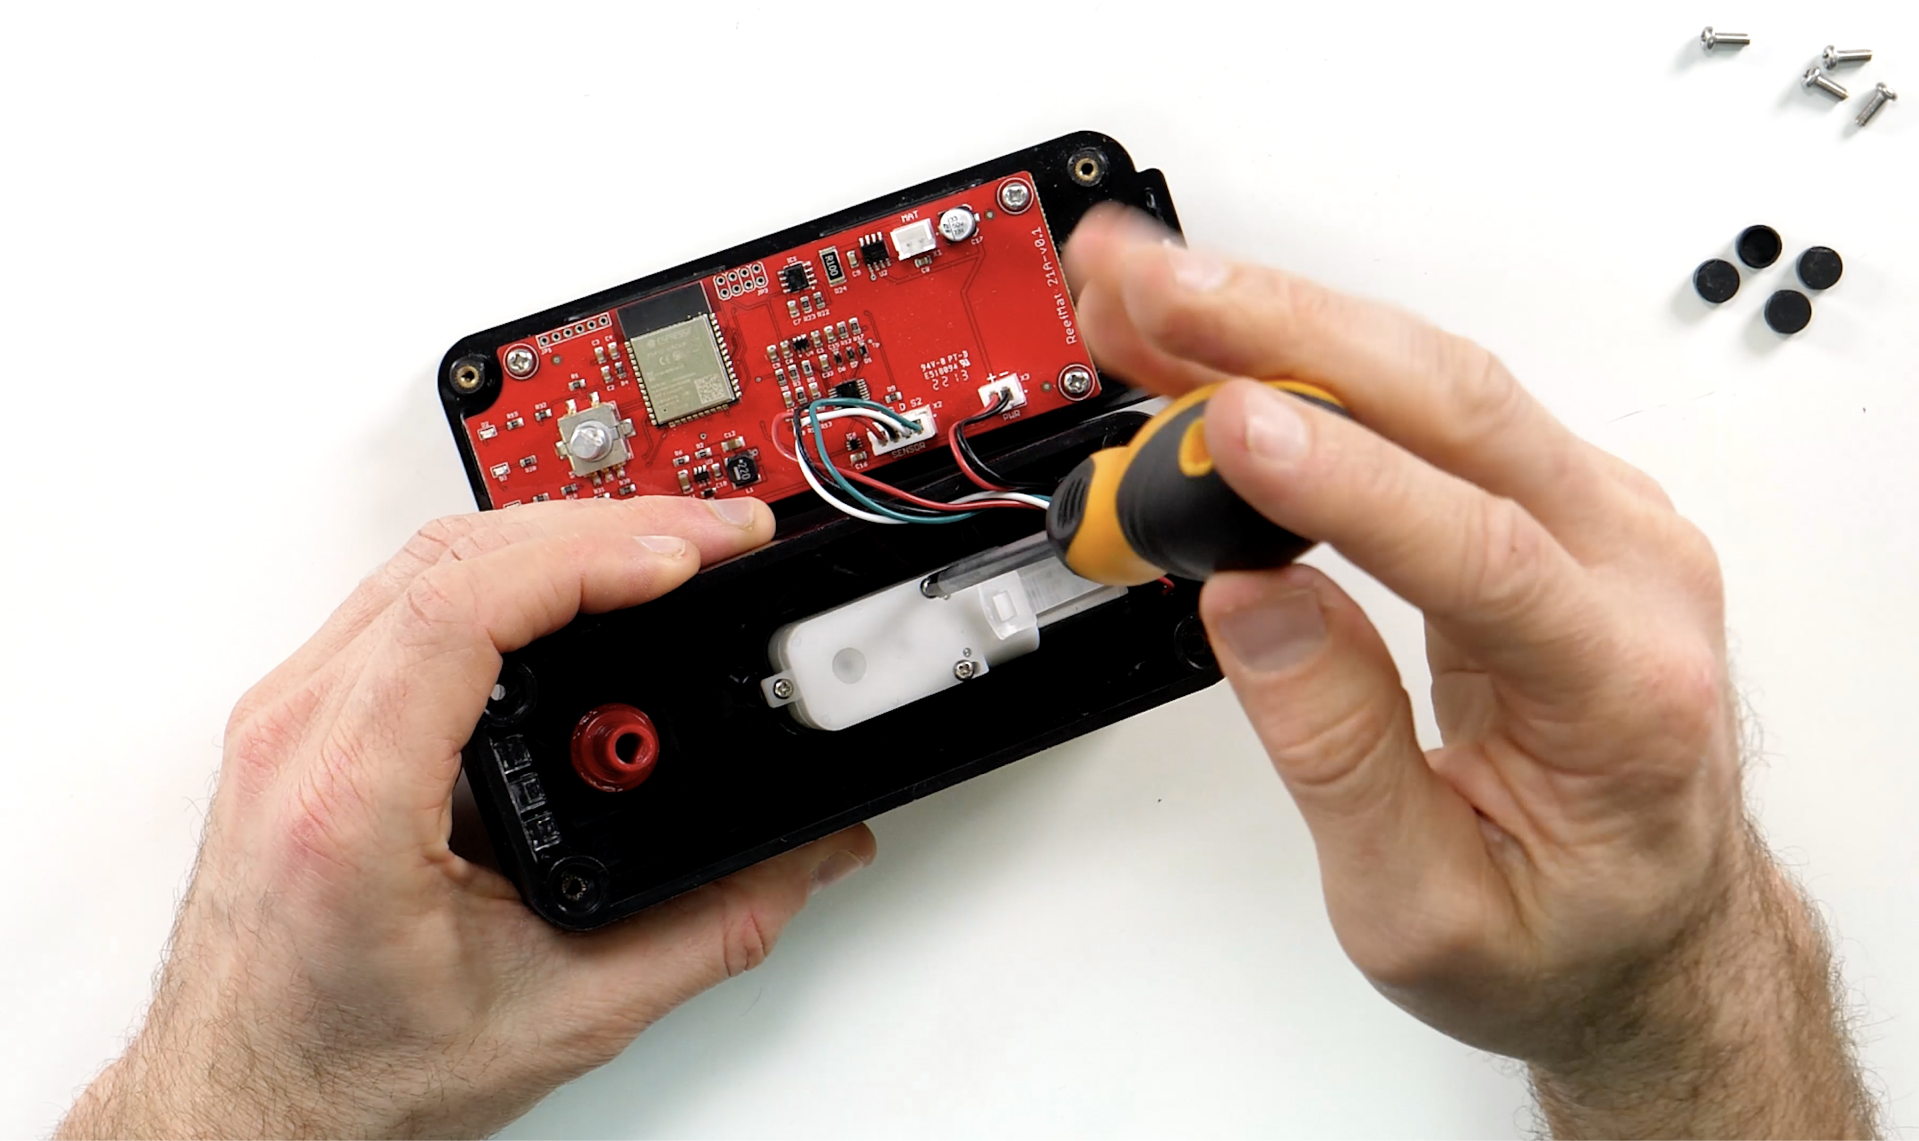
How to replace a gear motor
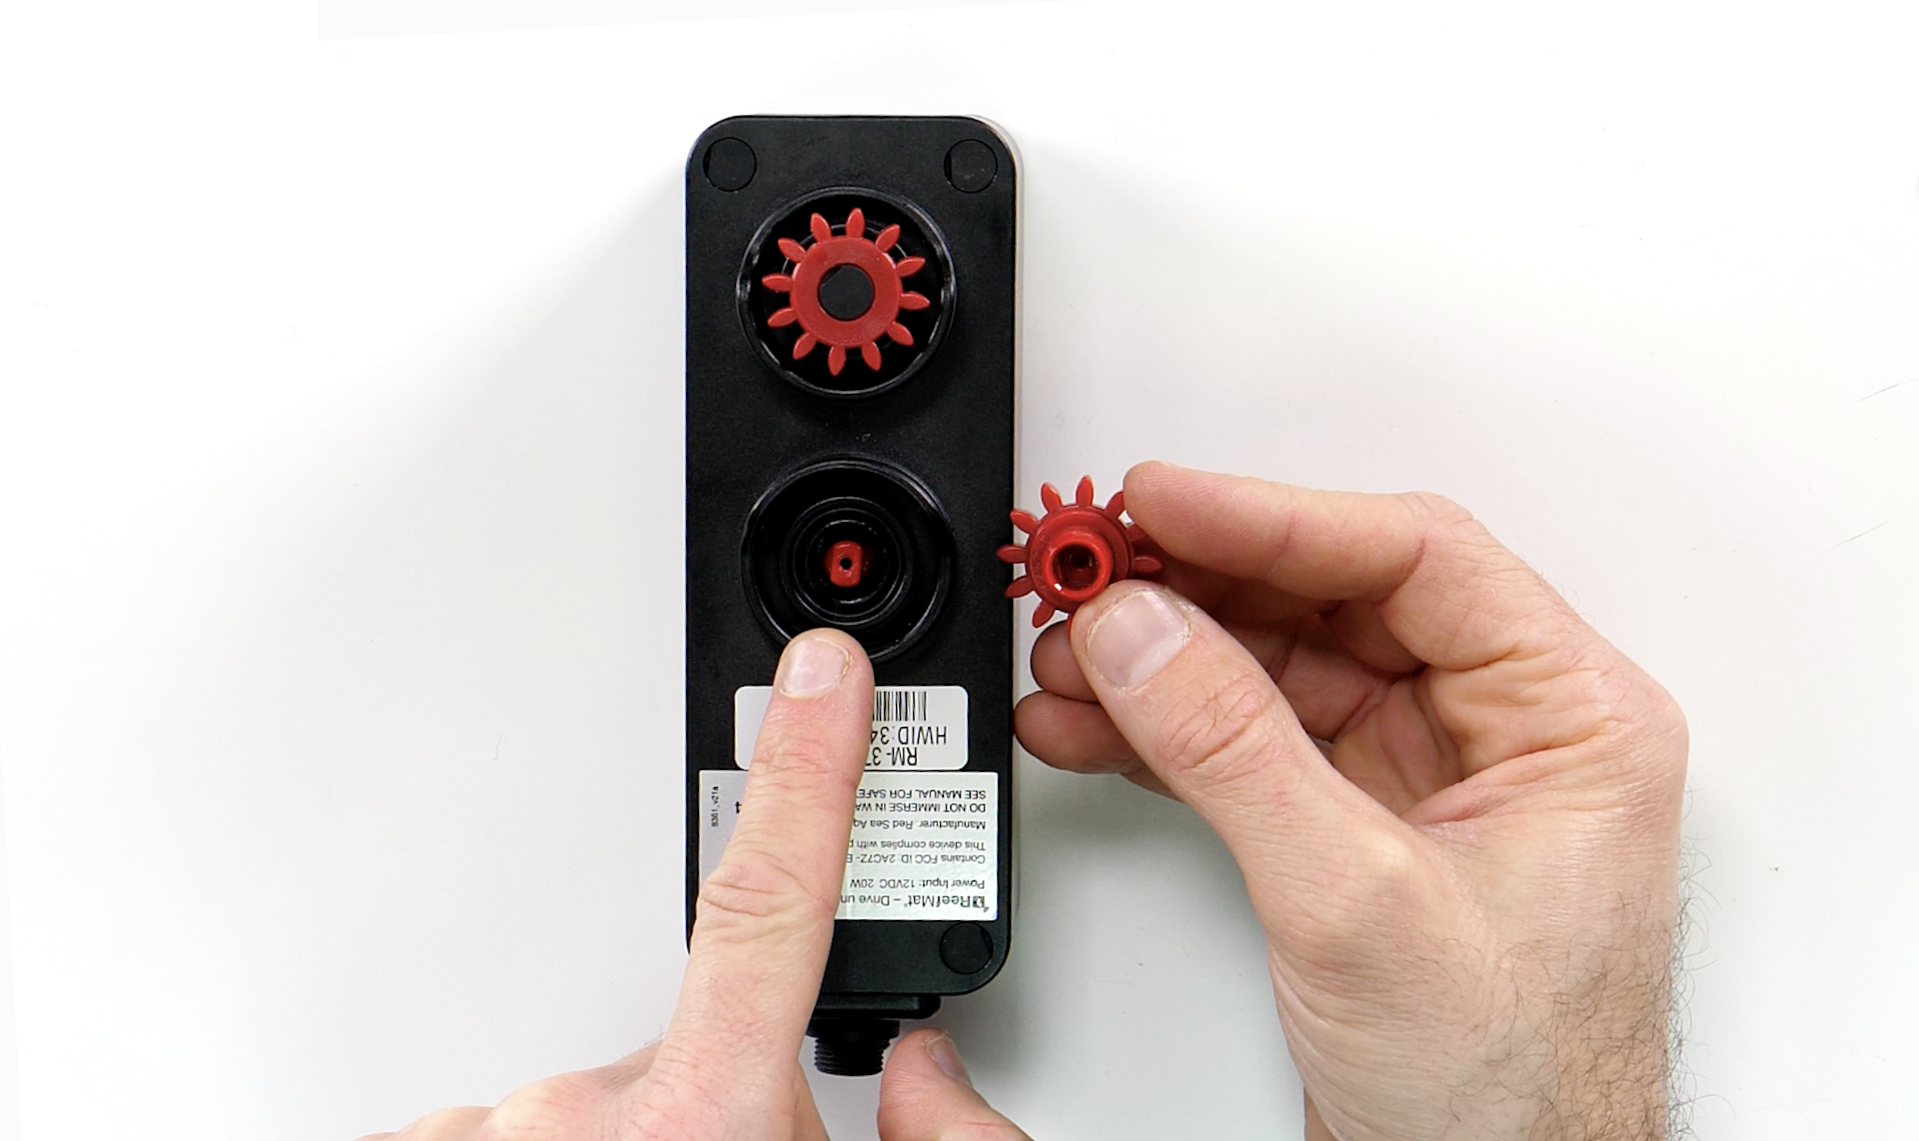
How to replace a gear wheel
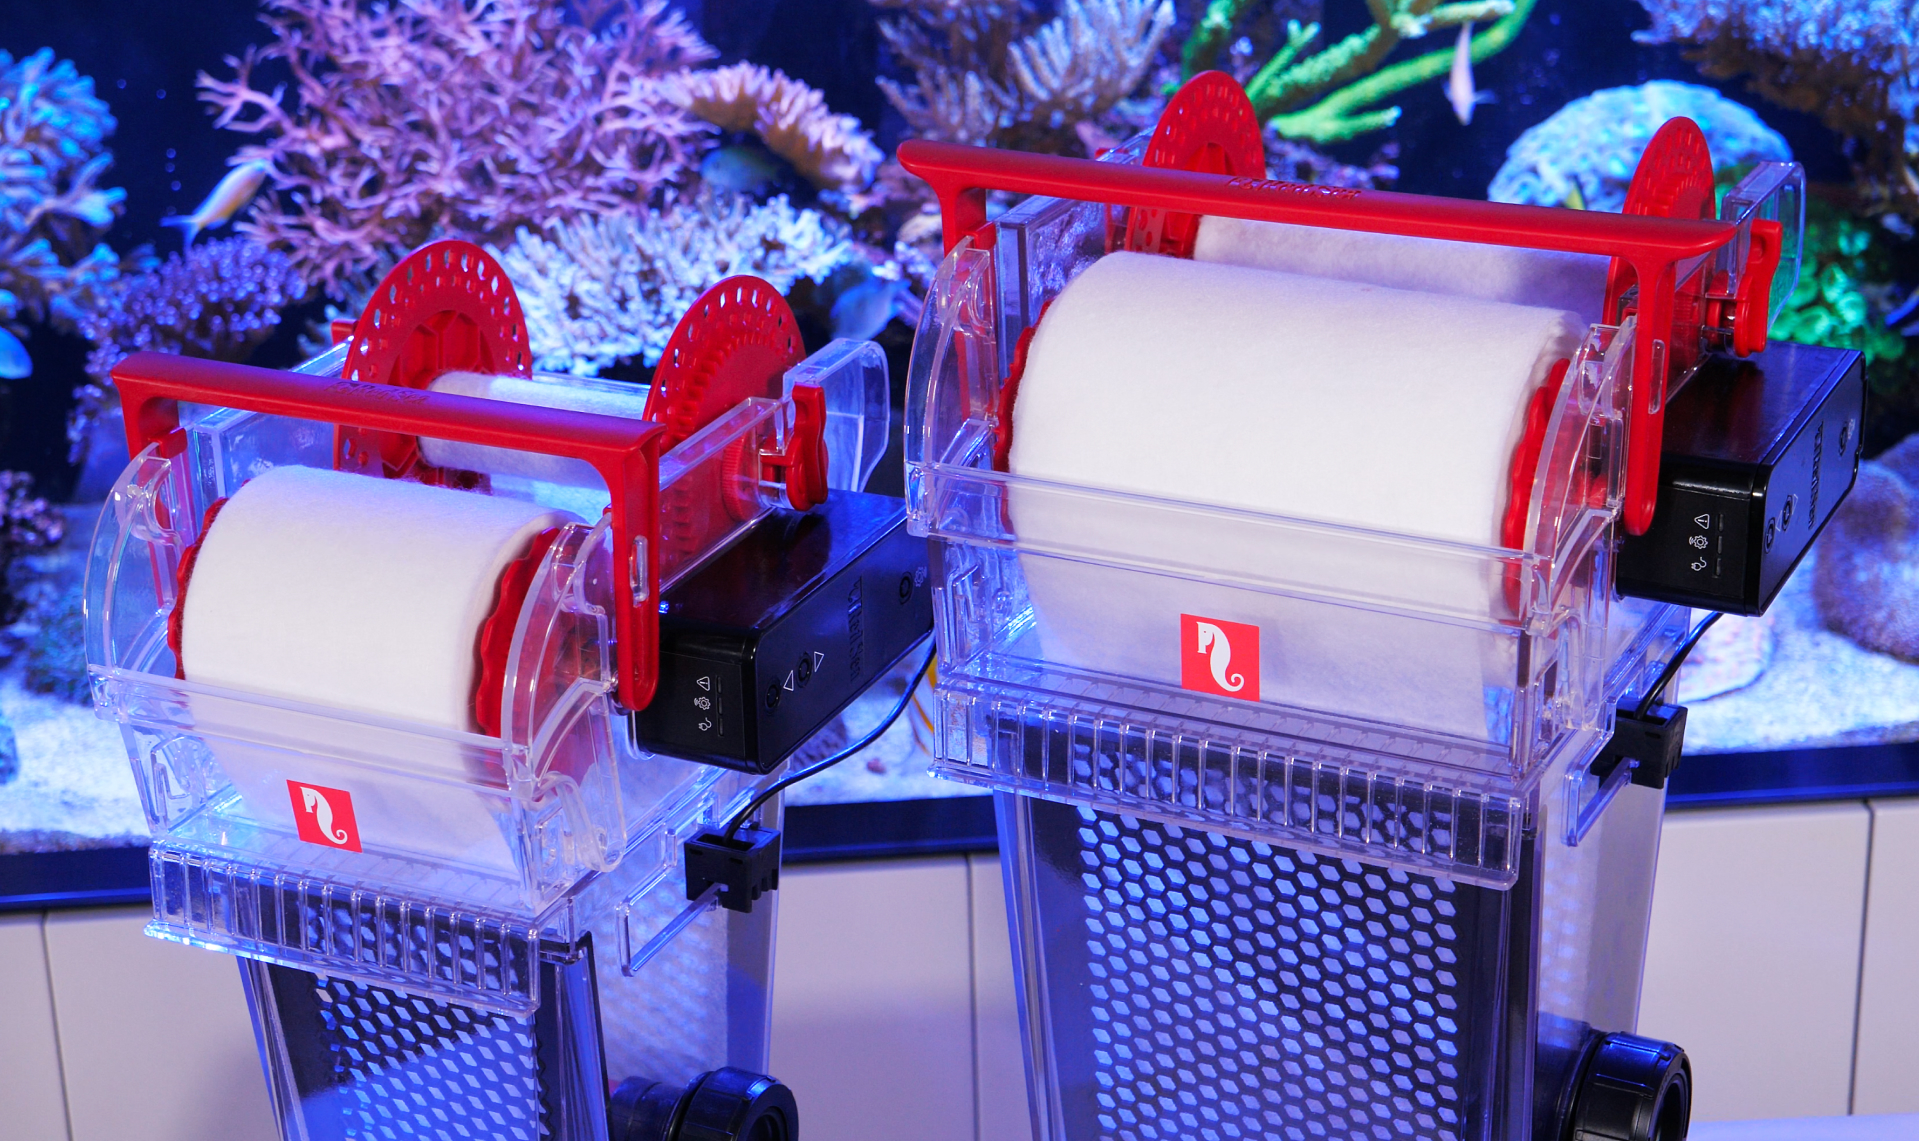
ReefMat 250