Loading
ReefSense Salinity & Temperature Probe
Introduction
The ReefSense Salinity & Temperature Probe adds continuous, accurate salinity monitoring to your ReefControl Pro/Lite. It’s a digital, temperature-compensated 4-pole conductivity probe with a built-in temperature sensor, so it reports both your aquarium’s salinity and its temperature to the ReefBeat App in real time – with 30-day logs and notifications – and it can use those readings to switch your equipment automatically.
Because it stays installed in your aquarium, it does what an occasional manual test can’t: it tracks salinity continuously, so slow trends and sudden changes show up early. And because it’s digital, it compensates its reading for temperature automatically, guides you through calibration step by step, and stores its own calibration data.
This manual assumes you already have a ReefControl Lite or Pro set up and running in the ReefBeat App. If you don’t, set up your ReefControl Pro/Lite first using its own manual, then come back here to add the Salinity Probe.
Understanding salinity in your reef aquarium
Salinity is the amount of dissolved salt in your water. It’s one of the most important reef parameters, because corals, fish and invertebrates are adapted to the stable salt concentration of natural seawater.
Reef aquariums are usually kept at about 35 ppt, which is roughly a specific gravity of 1.026 at 25 °C. As with most parameters, stability matters more than the exact value – rapid changes in salinity stress corals and other livestock.
Salinity rises as water evaporates: the water leaves but the salt stays behind. For that reason, evaporated water should be replaced with fresh RO/DI water, not saltwater (this is exactly what an automatic top-off does). Saltwater is only added during water changes or to correct a genuinely low salinity.
A temperature-compensated 4-pole conductivity probe has a real advantage here: it can stay in the aquarium and monitor salinity continuously. The 4-pole design improves stability and reduces the effects of polarization and fouling compared with simpler sensors, while temperature compensation corrects the reading as your tank’s temperature changes.
Continuous logging lets you see trends you’d otherwise miss – gradual salinity creep from evaporation, a top-off that isn’t keeping up, dosing or water-change differences, or sudden dilution from too much freshwater – giving you an early warning before salinity drifts out of range. Salinity is best read together with temperature, since both affect the density and conductivity of seawater.
What’s in the box
• ReefSense Salinity & Temperature Probe – R35820
• ReefSense snail guard – R35853
• 2 calibration solution sachets (seawater value, 53.1 mS/cm / 35 PSU)
Installation and placement
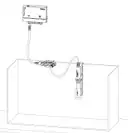
Position the probe in the aquarium or sump where there is good, steady water flow, using a probe holder, with the conductivity cell (the slot near the tip) fully immersed at all times. Keep the cell clear of trapped air and debris – good flow through it keeps the reading representative and helps prevent fouling. The ReefSense single probe holder (R35837) is an optional accessory for positioning the probe.
1. Fit the probe into your probe holder. If you’re fitting the snail guard, add it over the probe once the probe is in the holder.
2. Position the probe in the water with good flow around and through the conductivity cell.
3. Connect the probe to the ReefSense port connector cable, making sure the securing nut is fully closed for a stable, waterproof connection.
4. Arrange the cable into a drip loop so water can’t run down it to the connector.

Note:
Your probe comes with a ReefSense snail guard (R35853). If your aquarium has snails, worms or other microfauna that could settle inside the probe’s conductivity cell, fit the snail guard over the probe and clean it regularly – microfauna in the cell are the most common cause of low or erratic salinity readings.
Adding the probe in the ReefBeat App
Add the probe to your ReefControl Pro/Lite in the app:
1. Open your ReefControl Pro/Lite in the ReefBeat App and choose Setup Probe, then select Salinity & Temperature.
2. The app shows the ID of the probe it has found so you can confirm you’re setting up the right one, then continue. (If the app doesn’t detect the probe, check the connection and try again.)
3. If a newer version of the probe’s firmware is available, the app updates it before continuing over Bluetooth – keep your phone within approximately 3 m (10′) of the probe and leave the app open during the update.
4. Give the probe a name, or keep the default.
5. Choose your preferred salinity unit, set the parameter ranges for salinity (and for temperature), and choose whether to switch on the audible alarm for this probe.
Note:
You can add more than one Salinity Probe to the same ReefControl Pro/Lite. If you do, connect and set them up one at a time. If several new probes are connected at once before setup, the controller picks one of them at random, and you’ll have to check serial numbers to tell which is which.
Choosing your salinity unit. Salinity can be displayed as Conductivity (mS/cm), Salinity (PSU/ppt – the default), or Specific Gravity (S.G.). Pick whichever you’re used to working in.
Note:
The salinity unit is chosen during setup. To change it afterwards, delete the probe from the app and add it again, selecting the new unit. Whichever unit you choose, the Manual reading always shows the value in all three units.
Parameter ranges (Desired / Acceptable / Danger). For each parameter you set two ranges that tell ReefControl Pro/Lite what “normal” looks like for your tank: a Desired range (green, your target) and an Acceptable range (orange, drifting away from the target). Anything outside the Acceptable range is automatically the Danger range (red) – you don’t set this yourself. Your readings show against these on the homepage and in the graphs, and you can choose, for each parameter, to be notified when a reading enters its Danger range. You can also switch on the audible alarm; it is then enabled whenever a reading is outside the Acceptable range, and a short press of the Manual Control button silences it.
Note:
A brand-new Salinity Probe is calibrated at the factory and can be used straight away, but for the best accuracy let it settle in the aquarium for about a week after installation before its first calibration (see Calibration).
Calibration
A conductivity probe measures how easily a small electric current passes through the water between its electrodes. That depends on the fixed construction of the conductivity cell and on the water being measured; calibration defines the cell’s exact characteristics so the probe can report salinity accurately. The Salinity Probe is calibrated at a single point, using a seawater-value solution. You can calibrate at the aquarium or in remote mode (see Remote mode).
When to calibrate
The Salinity Probe doesn’t need regular recalibration. When you first install a new probe, let it run in the aquarium for about a week to settle, then calibrate it. After that, the main time to recalibrate is after cleaning the probe – removing calcium deposits or organic growth can slightly change the conductivity cell.
What you need
A salinity calibration solution (53.1 mS/cm / 35 PSU) – two sachets are supplied with the probe – a small clean container to hold it, and some RO water for rinsing. Always use fresh solution and don’t reuse solution the probe has already been in. Replacement solution packs are available (R35843).
The calibration process
The ReefBeat App guides you through each step:
1. When prompted, clean the probe, rinse it with RO water and dry it – this stops residue from contaminating the calibration solution.
2. Place the probe in the solution and gently wiggle it to release any air bubbles trapped inside the conductivity cell. Confirm the conductivity value of the solution you’re using; the app’s default is 53.1 mS/cm (35 PSU), the standard seawater-value calibration solution.
3. When you start the calibration, the probe stabilises for about three minutes and records the point automatically.
4. The app shows the measured value so you can confirm the calibration looks right. If it falls outside the expected range, the app tells you so you can rinse and try again.
5. Return the probe to the aquarium and wait about 30 seconds before closing the calibration in the app, to keep stray readings out of your logs.
Temperature
The probe also reports your water temperature, with its own ranges, log and control options, and it uses that temperature internally to compensate the salinity reading. Because of this, the app offers a Temperature Calibration option rather than a simple offset: changing it also changes the salinity value, so only adjust it with a high-precision laboratory temperature reference – otherwise leave it at the factory calibration.
Remote mode
You can use the Salinity Probe away from the controller, over Bluetooth – handy for taking a reading or calibrating at a sink rather than working down beside the sump. In remote mode the probe can be used for manual readings and for calibration.
1. Turn on remote use for the probe in the ReefBeat App.
2. Disconnect the probe from the ReefSense port connector.
3. Power the probe with the ReefSense USB-C connector (sold separately), plugged into any USB-C source.
4. In the app, tap Connect to start the Bluetooth (BLE) connection between the app and the probe.
When you’ve finished, you can tap Disconnect in the app, or simply remove power from the probe – once the probe is unpowered it disconnects automatically. After returning the probe to the aquarium, wait about 30 seconds before cancelling remote mode in the app, to keep stray readings out of your logs.
Firmware updates
From time to time the ReefBeat App will let you know that a firmware update is available for your Salinity Probe. Keeping the firmware up to date ensures it stays compatible with the app. Firmware updates are performed via Bluetooth; the probe must be connected to your ReefControl Pro/Lite and not in Remote mode (ensure Bluetooth is enabled in your phone’s settings). When you run an update, keep your phone within approximately 3 m (10′) of the probe and leave the app open during the update.
Accuracy and precision
The ReefSense Salinity Probe is optimised for seawater, with an accuracy of ±1% across the seawater range.
The precision of the reading depends on the conductivity: at 2.0 mS/cm and above it is shown to 0.1 mS/cm, and below 2.0 mS/cm to a much finer 0.001 mS/cm – that is a precision of 1 microsiemens (µS/cm).
Using the salinity reading to control equipment
Like any ReefSense reading, the salinity value can be used to switch equipment on and off. However, because snails, worms or other microfauna can settle inside the conductivity cell and disturb the reading, we don’t recommend automating aquarium equipment based on salinity. Use salinity-based control only in cleaner, more controlled situations – for example, when mixing new seawater – where the cell won’t be fouled by livestock.
If you do use it, set the relevant port or socket to be controlled by the Salinity Probe, choose the value at which it switches, and set a fallback state in case the probe is ever disconnected. (See your ReefControl Pro/Lite manual for how to assign a port or socket.)
Maintenance
The Salinity Probe is robust and not a wear part, but it reads best when the conductivity cell is kept clean and clear.
Snail guard. Microfauna – snails and worms – settling inside the conductivity cell are the most common cause of low or erratic readings. Fitting the ReefSense snail guard (R35853) helps keep them out; clean the guard and probe regularly.
Routine cleaning. Rinse the probe under RO water to remove salt and loose film, and make sure the conductivity cell is clear of debris. After a routine rinse the probe can be used straight away, without recalibrating.
Removing stubborn fouling. If organic film or mineral deposits have built up, clean in two stages, rinsing well with RO water between and after each stage:
1. Remove organics first with a diluted, plain (unscented) household bleach solution – 1 part bleach to 10 parts RO water. Soak the tip for 2-5 minutes, then rinse thoroughly with RO water.
2. Then remove mineral deposits with Red Sea’s probe cleaning solution (R35855), a weak acid, diluted 1:10 with RO water. Soak for 2-5 minutes, then rinse thoroughly with RO water.
WARNING:
Never allow bleach and the acid cleaning solution to mix – combining them releases toxic chlorine gas. Rinse the probe thoroughly with RO water between the two stages, never soak it in both at once, and handle household bleach with care.
If any stubborn growth remains inside the conductivity cell after soaking, remove it gently with a cotton bud (swab / Q-tip). Do not use any tool inside the cell that could damage the graphite electrodes.
Recalibrate after cleaning. Cleaning can slightly change the conductivity cell, so check the reading and, if necessary, recalibrate the probe after any thorough clean.
You can do cleaning and calibration comfortably at a sink in remote mode (see Remote mode).
Tip:
Before taking the probe out of the water – for cleaning, for example – turn on Disable Probe in its settings so out-of-water readings aren’t recorded. Remember that a port or socket controlled by the probe switches to its fallback state while the probe is disabled.
Troubleshooting
Press here for the Troubleshooting guide for the full ReefControl Family
Warranty
Note:
The ReefSense Salinity & Temperature Probe carries the standard 24-month Red Sea warranty.