Loading
ReefControl ATO Module
Introduction
The ReefControl ATO Module is a complete automatic top-off (ATO) system for your reef aquarium. Working together with a ReefControl Lite or ReefControl Pro controller, it keeps your aquarium’s water level constant by automatically replacing the fresh (RO) water lost to evaporation.
At the heart of the Module is the digital ReefSense ATO Sensor, which measures the water level in your sump and also includes a built-in temperature sensor – so the same device that manages your top-off also gives you an accurate, continuous water-temperature reading in the ReefBeat App.
This manual covers only the installation and use of the ATO Module. It assumes you have already installed your ReefControl Lite or Pro controller and set it up in the ReefBeat App, as described in the ReefControl Pro/Lite manual. If you have not done that yet, please complete it first.
Safety
PLEASE READ AND FOLLOW ALL SAFETY INSTRUCTIONS
THIS DEVICE IS INTENDED FOR HOUSEHOLD AND INDOOR USE ONLY.
DANGER: To avoid possible electric shock, special care should be taken when handling a wet aquarium. For each of the following situations, do not attempt repairs yourself; return the appliance to an authorized service facility for service or discard the appliance.
WARNING: To guard against injury, basic safety precautions should be observed, including the following:
Do not operate any appliance if it has a damaged cord or plug, if it is malfunctioning, or if it is dropped or damaged in any manner.
This appliance can be used by children aged from 8 years and above and persons with reduced physical, sensory, or mental capabilities or lack of experience and knowledge if they have been given supervision or instruction concerning use of the appliance in a safe way and understand the hazards involved. Children shall not play with the appliance. Cleaning and user maintenance shall not be made by children without supervision.
The appliance is only to be used with the power supply unit provided with the ReefControl Pro/Lite controller.
Close supervision is necessary when any appliance is used by or near children.
To avoid injury, do not contact moving parts.
Always unplug an appliance from an outlet when not in use, before putting on or taking off parts, and before cleaning. Never pull the cord itself to remove the plug from the outlet. Grasp the plug and pull to disconnect.
Do not use an appliance for anything other than its intended use. The use of attachments not recommended or sold by the appliance manufacturer may cause unsafe conditions.
Do not install or store the appliance where it will be exposed to the weather or to temperatures below freezing point.
Make sure an appliance is securely installed before operating it.
To avoid water running down a cable into the controller or an outlet, always arrange the cable of every connected device into a drip loop – a low point in the cable below the level of the socket – so that water drips off rather than reaching the connection.
Read and observe all the important notices on the appliance.


Note:
Run the ATO Pump only in liquid; running it dry can damage it. The Auto-Fill includes protections (see How the Auto-Fill works), but never leave the pump powered in an empty reservoir.
Components of the ATO Module
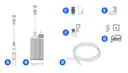
ReefControl ATO Module (R35823) – complete kit, containing:
ReefControl controller – ReefControl Lite (R35812) or ReefControl Pro (R35813):
• (A) ReefSense ATO Sensor – water-level sensor with built-in temperature sensor – R35829
• (B) ATO Pump – R35621
• (C) Siphon breaker – R35627
• (D) Silicone tubing – R35626
• (E) ATO Sensor holder – R35629
• (F) Tube holder – R35624
• (G) Magnetic corner mounting bracket (for non-Red Sea sumps) – R35623
Note:
The ATO Module connects to a ReefControl Lite or Pro controller – there is no separate controller and no power supply in the Module. The ATO Sensor connects to the controller’s ReefSense port; the ATO Pump connects to a 12 VDC port.
Note:
Unlike the ReefATO+, the ReefControl ATO Module does not include a Leak Detector. A ReefSense Leak Detector is available separately and connects to the controller’s ReefSense port – see the ReefControl Pro/Lite manual.
How the Auto-Fill works
When Auto-Fill is enabled, the ATO Module holds your sump’s water level within a narrow band – about 3 mm (1/8″) – between the “pump-on” and “pump-off” probes of the ATO Sensor. When the level falls to the lower “pump-on” probe, the ATO Pump switches on and draws fresh water from your RO reservoir; when the level rises to the “pump-off” probe, the pump switches off.
The ATO Sensor has several built-in safeguards:
• A backup “pump-off” probe sits about 2.5 cm (1″) above the normal pump-off probe, to stop the fill if the normal probe ever fails to sense the rising water.
• A pump time-out switches the pump off if it runs noticeably longer than a normal fill should take for your system.
The Auto-Fill switches itself off automatically if any of these occur:
• the pump is missing, times out, runs dry (empty reservoir) or is blocked;
• the ATO Sensor is missing or disconnected.
In each case, resolve the cause and then resume the Auto-Fill.
Temperature monitoring
The ATO Sensor includes an accurate digital temperature sensor. It reports your water temperature to the ReefBeat App in real time, builds a temperature log, and can notify you if the temperature moves outside the range you set – exactly like a ReefSense Temperature Probe. You can also apply a small offset to match your other thermometers (see Setting up the ATO Module).
Note:
The ATO Sensor’s temperature reading can also switch equipment on and off – for example, a cooling fan or a heater. See Using the temperature reading to control equipment.
Installing the ATO Module
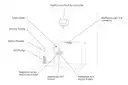
You will mount the ATO Sensor in your sump, place the ATO Pump in your RO reservoir, run the silicone tubing between them, and connect both to your ReefControl Pro/Lite controller. Arrange every cable into a drip loop (see Safety).
Mounting the ATO Sensor
The ATO Sensor sits in the return-pump chamber of your sump, where the water level is stable.
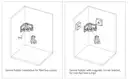
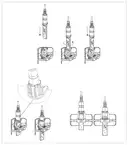
1. On a Red Sea aquarium, click the sensor holder onto the glass triangle in the return-pump chamber. (On older systems with a gravity-fed float valve, first remove the valve by unscrewing its nut, then click the holder onto the glass triangle.) On a non-Red Sea sump, attach the sensor holder to the magnetic corner bracket and mount it on an internal wall so the sensor hangs vertically.
2. Slide the ATO Sensor into the holder and click it into the higher or lower position, whichever suits your sump, so that your desired water level falls between the “pump-on” and “pump-off” pins. The level will settle to this point once Auto-Fill begins.
3. Route the sensor cable through the cabinet and connect it to the ReefSense port connector cable, with the securing nut fully closed, like any other ReefSense Probe or Sensor.
Note:
The magnetic corner bracket’s magnets are very strong – handle them with care.
Installing the ATO Pump and tubing
1. Connect the water outlet of the ATO Pump to the tube holder using the silicone tubing provided. Cut the tubing squarely (at 90°), push it fully onto the hose-barb until it meets the securing nut, then screw the nut over the tubing.
2. Fix the tube holder to the top rim of the sump chamber where the sensor is located. Its outlet should be above the highest water level the sump will reach, and preferably not directly above the sensor.
3. If the water in your RO reservoir can ever rise higher than the tube holder, fit the siphon breaker on the silicone tubing so that it sits below the rim of the reservoir but always above the water level. This prevents the reservoir siphoning into the sump. (A little water trickles from the siphon breaker back into the reservoir whenever the pump runs – this is normal.)
4. Secure the tubing at each connection with the lock nuts provided, and place the pump in the RO reservoir, standing it vertically and clear of the reservoir walls for quiet running and to use as much of the water as possible.
5. Route the pump’s cable through the cabinet and connect it to a 12 VDC port on your ReefControl Pro/Lite controller. On a Pro, note which port you used.
Note:
Before you set up the Module in the app, measure two things you’ll be asked for: the approximate length of tubing between the pump and the tube holder, and the vertical height from the bottom of the pump to the tube holder’s outlet.
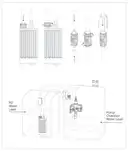
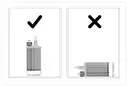
Once everything is connected, you can press the controller’s Manual Control button to run the pump and confirm water flows correctly. The Auto-Fill itself will not run automatically until you set up and enable it in the app.
Setting up the ATO Module
With the controller already added to the ReefBeat App, you only need to add the ATO Module and configure the top-off.
Add the ATO Module
In the ReefBeat App, add a new device to your ReefControl Pro/Lite and select the ATO Module – not the ATO Sensor on its own. Choosing the ATO Module tells the app that the sensor is working together with the Red Sea ATO Pump as a complete top-off system; selecting the ATO Sensor instead would set it up as a standalone water-level sensor (covered in the ReefControl Pro/Lite manual).
Give the Module a name, and set its temperature ranges and audible-alarm preference (see Temperature ranges, alarm and logs).
Set up the Auto-Fill
1. Assign the 12 VDC port you connected the pump to, and set it to be controlled by the ATO Sensor’s water level.
2. When prompted, enter the length of tubing and the height you measured during installation. (The length must not be smaller than the height.) The app uses these to set the correct pump speed and to estimate the flow rate used in the top-off log and the reservoir monitor.
3. Auto-Fill starts switched off, so you can confirm the sensor is correctly placed and the reservoir has water. When you are ready, toggle Auto-Fill ON.
Water Volume – pump flow rate
The water volumes shown in the daily volume, the top-off log and the optional reservoir volume monitor are all based on an estimated flow rate for the pump, worked out from the tube length and height you entered. If you want to replace the default estimated flow rate with a more accurately measured one, do as follows:
Before you start, make sure the app is set to the correct length and height of the silicone tube, as these affect the pump-speed setting.
Place a collection vessel of about 1 litre at the end of the tube, hold the tube end at roughly the same height as in normal operation, and start the pump from the app. (Depending on the tube length, it may take a few seconds for water to begin flowing from the end of the tube.) Once water is flowing, collect it for 15 seconds and switch the pump off. Multiply the collected volume by 4 to get the flow rate in ml per minute, and enter that figure in the app – in the ATO Sensor’s settings, open More settings and use Update Flow rate.
In most setups the 15-second sample is around 300 ml, but it can range from about 75 to 750 ml. Weighing the vessel before and after on a kitchen scale gives a more accurate result (1 g of water equals 1 ml). For increased accuracy, repeat about three times and use the average. You can reinstate the default estimated flow rate from the app at any time.
Reservoir volume monitor (optional)
If you enter your RO reservoir’s volume, the app deducts each fill and shows the estimated water remaining, warning you about 24 hours before it is due to run out. Re-enter the volume each time you refill. This monitor is approximate and has no effect on the Auto-Fill itself – the controller detects an empty reservoir from the pump’s behaviour, switches Auto-Fill off, and waits for you to refill and resume.
Temperature ranges, alarm and logs
The ATO Sensor’s temperature is treated like any ReefSense reading. You set two ranges so the app knows what “normal” is for your tank – a Desired range (green, your target) and an Acceptable range (orange, drifting away from the target). Anything outside the Acceptable range is automatically the Danger range (red) – you don’t set this yourself. Your reading is shown against these on the homepage and in the graph, and you can choose to be notified when it enters the Danger range; if you switch on the audible alarm for the ATO Sensor, it is then enabled whenever the temperature is outside the Acceptable range. You can also apply an offset (Temp Adjustment) to match another thermometer. The temperature log keeps the last 30 days, and the top-off log records the number of fills and the volume added each day.
Note:
Temperature follows your aquarium’s volume unit: it’s shown in °C when the aquarium’s volume is set in litres, and in °F when it’s set in gallons.
Operation
Once Auto-Fill is enabled, the ATO Module runs on its own, keeping your water level steady without further input. It will pause and ask for your attention only if something needs fixing – for example, if the pump is missing, times out, runs dry or is blocked, or if the ATO Sensor is disconnected.
When that happens, resolve the cause (for example, refill the reservoir or clear a blocked tube), then resume the Auto-Fill in either of these ways:
• a short press of the Manual Control button on the controller; or
• the Resume button in the app: Homepage > ATO Settings > Resume.
Water changes and sump maintenance
During a water change – or any time you are working in the sump – the water level will move around, and an enabled Auto-Fill may try to “correct” it by adding RO water when you don’t want it to. Before you start, pause the top-off: set the ATO Sensor’s port to Always Off, or simply toggle Auto-Fill off, for the duration of the work.
When you have finished and the sump has settled back to its normal level, set the port and Auto-Fill back on. After a water change, if you would rather top the sump back up with salt water manually first, leave Auto-Fill off until you have done so, then switch it back on so the ATO only adds RO water afterwards.
Maintenance
The ATO Module works best with a little routine cleaning. Always disconnect the pump from its 12 VDC port before taking it out of the reservoir, and pause the Auto-Fill before lifting the sensor so the pump doesn’t run while the sensor is out of the water.
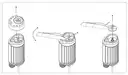
ATO Pump. Remove the impellor chamber cover about once a month to make sure the impellor chamber is free of any particulate matter. If necessary, the impellor can be removed for cleaning by inserting the point of a tweezer into the gap between the impellor and the impellor shaft, then rotating and pulling outwards. To replace the impellor, align the flat part of the impellor shaft with the impellor and push down until it clicks into position.
ATO Sensor. Keep the sensor free of any build-up of organic waste, algae growth or salt deposits on a regular basis. The sensor is waterproof and can be safely washed under running water, and its titanium tips can be brushed to remove any hard deposits. It is recommended to wipe the sensor pins to remove build-up about once a month. Switch off the Auto-Fill before removing the sensor for maintenance. If the sensor holder is not easily visible, after returning the sensor use Check sump water level in the app to confirm it is in the correct position.
Note:
If the sensor will be out of the water for a while, you can pause its temperature log so the time out of the tank isn’t recorded – open the ATO Sensor’s settings and use Update log. Re-enable it when the sensor is back in place.
Using the temperature reading to control equipment
Besides managing your top-off, the ATO Sensor’s built-in temperature reading can switch equipment on and off, just like a ReefSense Temperature Probe:
• On a ReefControl Pro, the ATO Pump uses one 12 VDC port, leaving the second port free – you can have the ATO Sensor’s temperature control a 12 VDC device on Port 2, such as a cooling fan.
• If a ReefControl Power is paired with your controller, the ATO Sensor’s temperature can control any of its AC sockets, such as a heater or chiller.
Setting this up is covered in the other manuals – controlling 12 VDC ports in the ReefControl Pro/Lite manual, and controlling sockets in the ReefControl Power manual – but it is worth knowing that the one sensor managing your top-off can also look after your temperature control.
Troubleshooting
Press here for the Troubleshooting guide for the full ReefControl Family
Spare parts
Warranty
Red Sea Products Limited Warranty.
The limited warranty sets forth all of Red Sea Aquatics Ltd (Red Sea) responsibilities regarding this product. There are no other express or implied warranties from Red Sea.
Red Sea warrants your product against defects in materials and workmanship for a period of 24 months, valid from the date of original purchase, and will repair this product free of charge (not including shipping costs) with new/rebuilt parts. The precondition for the warranty is that the stipulated set-up routine is observed. In the event that a problem develops with this product during or after the warranty period, contact your local dealer or Red Sea (at the company address indicated) for details of your nearest authorized service center.
The warranty is extended only to the original purchaser. Proof of date of purchase will be required before warranty performance is rendered. This warranty only covers failures due to defects in materials or workmanship which occur during normal use. It does not cover damage which occurs during shipment or failures which result from misuse, abuse, neglect, improper installation, operation, mishandling, misapplication, alteration, modification or service by anyone other than an authorized Red Sea service center. Red Sea shall not be liable for incidental or consequential damages resulting from the use of this product, or arising out of any breach of this warranty. All express and implied warranties, including the warranties of saleability and fitness for particular purpose, are limited to the applicable warranty period set forth above.
These statements do not affect the statutory rights of the consumer.
USA
Some states do not allow the exclusion or limitation of incidental or consequential damages, or limitations on how long an implied warranty lasts, so the above exclusion or limitations may not apply.
Regulatory
European Union – Disposal Information:
This symbol means that, according to local laws and regulations, your product should be disposed of separately from household waste. When this product reaches its end of life, take it to a collection point designated by local authorities. Some collection points accept products for free. The separate collection and recycling of your product at the time of disposal will help conserve natural resources and ensure that it is recycled in a manner that protects human health and the environment.

DISPOSAL:
Do not dispose of this product as unsorted municipal waste. Collection of such waste separately for special treatment is necessary. This product must not be disposed of together with the domestic waste. This product has to be disposed of at an authorized place for recycling of electrical and electronic appliances. By collecting and recycling waste, you help save natural resources, and make sure the product is disposed of in an environmental friendly and healthy way.